Install with Helm
Once the four dependencies from Prepare your environment
are ready, the deployment is a short checklist of one-time prerequisites followed by a single
Helm install. This page covers what to prepare and where to enter the values you collected.
The full parameter reference, upgrade, uninstall, and troubleshooting are in helm/README.md
inside your installation package — open that file for anything this page does not cover. If
you are evaluating and do not yet have the installation package, ask your CodeTogether
contact for it; the full reference travels with the chart it documents.
- Deployment: On-premises
Packaging
CodeTogether AI is a single container image. The Helm chart manages the Deployment, Service, Ingress, and Secrets for that container in your cluster. Configuration is supplied as a properties file; a separate Kubernetes Secret holds the protected storage master key.
Multiple replicas are supported and recommended for production. Set replicaCount in
your values to the desired count; see helm/README.md in your package for details.
Sizing guidance for the server pod is not yet finalized; ask your CodeTogether contact for interim sizing for your environment before you provision hardware or set resource requests and limits.
Before you begin: one-time prerequisites checklist
Work through these steps before running the install command. Each is a one-time setup — upgrades do not repeat them.
-
Registry credentials — your CodeTogether contact provides a username and password for the container image registry,
hub.edge.codetogether.com(the chart's defaultimageCredentials.registry; seehelm/README.md). Confirm the registry hostname in your credentials email if it differs from this default. -
Namespace — decide on a Kubernetes namespace (for example
ctai). Create it now withkubectl create namespace ctai, or let the install command create it with--create-namespace. Create it now if you plan to apply the protected storage master key Secret before running the install command —kubectl applyinto a namespace that does not exist yet fails. -
Properties file — the
helm/directory in your installation package containsctai-configuration.properties.templateand the helper scripts. Copy the template and fill in all values using the table in Values to configuration. Rungenerate-properties-secrets.sh(inhelm/) to generate the two secret values the properties file requires —github_state_secretandsso_jwt_secret:./generate-properties-secrets.shThe script prints the values; paste them into your copy of the properties file. They enter the install through
ctaiPropertiesFilelike every other properties value — there is no separate Secret to apply for these.One value in the template comes from no team: set
company_nameto your company name. See Organization.No
<placeholder>text must remain — Helm fails at template time if any does. -
Protected storage master key — run
generate-master-key.sh(inhelm/) to create the Kubernetes Secret, then apply it before the install. This requires the namespace from the previous step to already exist:./generate-master-key.sh --k8s-secret-yaml --secret-name ctai-master-key \> ctai-master-key-secret.yamlkubectl apply -f ctai-master-key-secret.yaml -n ctaiStore
ctai-master-key-secret.yamland the base64 key value in your password manager. That stored copy is the recovery path: if the Secret is ever lost from the cluster, reapply it from the stored YAML and encrypted values remain readable. There is no recovery without it — if you change or lose the key after the database holds data, existing encrypted values cannot be decrypted, so a database backup is only restorable together with the key that was in use when it was taken. Protect the stored copy with the same rigor as those backups. -
TLS — either confirm the pre-created TLS Secret is present in your namespace, or confirm cert-manager is configured for your ingress.
-
Ingress class — if your cluster has no default ingress class, note the class name to pass as
ingress.className.
Install
Apply the master-key Secret (if not already applied in the checklist) — this requires the
ctai namespace to already exist, since --create-namespace below only creates it once the
install itself starts. Then install the chart:
helm install ctai . \
  --namespace ctai --create-namespace \
  --set-file ctaiPropertiesFile=./ctai-configuration.properties \
  --set imageCredentials.username=<registry-username> \
  --set imageCredentials.password=<registry-password> \
  --set masterKey.source=secret \
  --set masterKey.existingSecret=ctai-master-key
Replace <registry-username> and <registry-password> with the credentials from your
CodeTogether contact. The chart installs from the local chart directory (.) included in
your package.
--set imageCredentials.password=<registry-password> places the password in your shell
history and in the Helm release's stored values. If that is a concern, create the pull
Secret yourself and set imageCredentials.pullSecret to its name instead — see
helm/README.md's Private registry section.
masterKey.source=secret and masterKey.existingSecret=ctai-master-key match the chart
defaults. If you used a different Secret name when applying the master key in the prerequisites
checklist, replace ctai-master-key with that name. See helm/README.md for non-default
master key configurations.
After install, Helm prints the application URL and health-check endpoints. See helm/README.md
in your installation package for how to confirm the deployment, run helm test, and for the
full upgrade, uninstall, and troubleshooting reference.
Set replicaCount to 2 or more for production deployments. The chart manages the
Deployment; the cluster distributes pods across nodes.
helm install ctai . ... --set replicaCount=2
Values to configuration
This table shows where each value collected in
Prepare your environment enters the configuration. Most
values go into ctai-configuration.properties; a few are Helm chart values.
Organization
One properties value is not collected from any of the four teams. Set your company name
yourself before you install, as company_name=<your-company-name> — the template ships it
as a <placeholder>, and Helm fails at template time if a placeholder remains.
This is the name the portal displays on Settings > General. An administrator can change it there later.
Networking
| Collected value | Properties key | Helm chart value |
|---|---|---|
| Service hostname | service_fqdn=https://<hostname> | service.fqdn=https://<hostname> |
| TLS Secret name | — | ingress.tls.secretName=<name> |
| Ingress class name | — | ingress.className=<name> |
service_fqdn in the properties file and service.fqdn in Helm values must match exactly.
Setting ingress.className to the literal value codetogether-nginx also makes the chart
create a cluster-scoped IngressClass of that name. Use a different class name if your
cluster already has its ingress class defined elsewhere.
If your networking team returned cert-manager as the TLS method rather than a pre-created
Secret name, add the appropriate cert-manager issuer annotation to ingress.annotations and
set ingress.tls.secretName to the name of the Secret cert-manager will write the certificate
into. The exact annotation key (cert-manager.io/cluster-issuer or cert-manager.io/issuer)
depends on your cert-manager configuration; see helm/README.md in your installation package.
Single sign-on
Enter each provider as a numbered block (sso_provider1, sso_provider2, …). The example
shown here is for a single Keycloak provider; other OIDC providers follow the same shape.
| Collected value | Properties key |
|---|---|
| Provider type | sso_provider1_type=keycloak |
| Provider name | sso_provider1=keycloak |
| Client ID | sso_provider1_client_id=<value> |
| Client secret | sso_provider1_client_secret=<value> |
| Issuer URL | sso_provider1_client_issuer_url=<value> |
| Display label (optional) | sso_provider1_display_label=<value> |
For GitHub and other OAuth-only providers, use _auth_uri, _token_uri, _info_uri, and
_jwt_set_uri instead of _client_issuer_url. See the comments in the properties template
for the standard GitHub endpoint values and for configuring more than one provider.
Outbound email
| Collected value | Properties key |
|---|---|
| SMTP hostname | smtp_host=<value> |
| SMTP port | smtp_port=587 |
| Requires auth | smtp_auth_enabled=true or false |
| SMTP username | smtp_username=<value> |
| SMTP password | smtp_password=<value> |
| Sender address | email_from_address=<value> |
| Sender display name | email_from_name=<value> |
PostgreSQL database
| Collected value | Properties key |
|---|---|
| Database URL | database_url=jdbc:postgresql://<host:port>/<database> |
| Database username | database_username=<value> |
| Database password | database_password=<value> |
| Telemetry schema | database_telemetry_schema=telemetry |
| Platform schema | database_platform_schema=platform |
| Datamart schema | database_datamart_schema=datamart |
Registry credentials
Registry credentials are passed as Helm values and are not stored in the properties file.
| Value | Helm chart value |
|---|---|
| Registry username | imageCredentials.username=<value> |
| Registry password | imageCredentials.password=<value> |
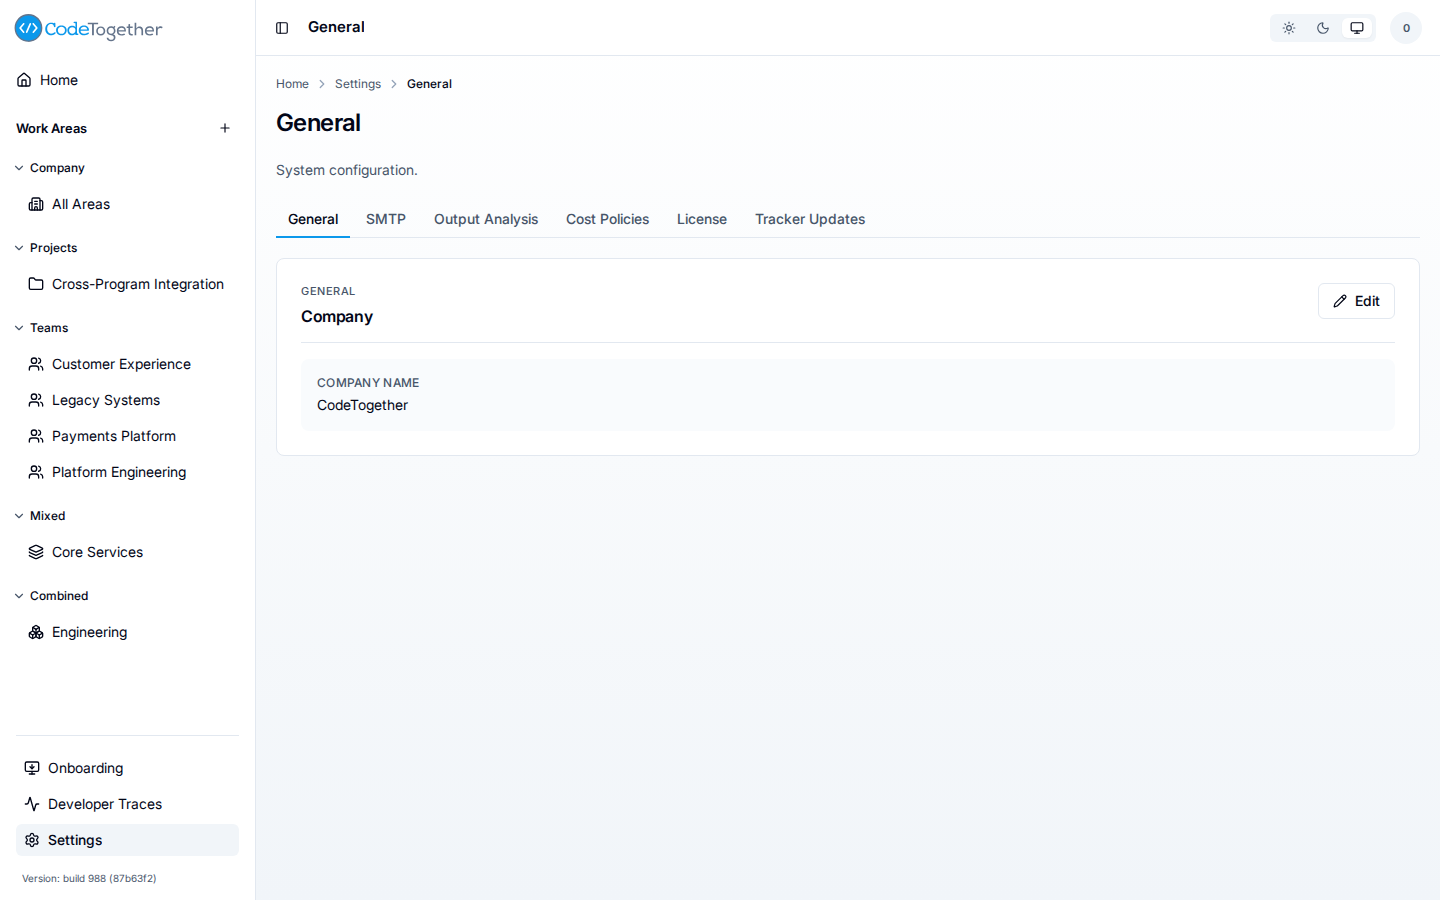
One of the five areas on the portal's Settings page. The tabs across the top — General, SMTP, Output Analysis, Cost Policies, License, and Tracker Updates — reflect the configuration values supplied during the Helm install. Tracker Updates holds the switch that pauses automatic tracker updates for the trackers connected to this server.
The Company name shown on the General tab is the company_name value from your properties file.
After install
Once the pod is running and the portal is reachable, continue with:
- Set up your organization — enter your license, connect source control, and invite co-administrators.
- Activate a workstation against your server — point developer machines at the server URL.
Related
- Prepare your environment — the values this install consumes.
- Set up your organization — what to do once the server is running.
- Deploy CodeTogether AI on-premises — the deployment overview.