Activate a workstation against your server
Use this guide to connect a workstation to your self-hosted server. You'll open the workstation setup link or the portal's Onboarding page, follow the steps for your IDE, and confirm the workstation is connected — or, from a terminal instead, run setup with your server's base URL.
- Deployment: On-premises
On-premises setup uses a base URL rather than an install token. No token redemption occurs.
Network reachability to the server's base URL is the practical control on which
workstations can activate. If activation must be limited to specific machines, restrict
network reachability to the hostname — rolling out setup through the Fleet distribution
device-management pattern controls which machines receive the installer, but not which
machines can reach the server, so it doesn't substitute for that restriction. Captured
activity is attributed by the workstation's existing Git committer identity (the
user.name and user.email already in its commits) — no login or credential is involved.
See What is captured.
Rolling this out across many machines? Workstation setup can be distributed through your existing device-management software so each machine is configured without anyone opening a terminal — see Onboard a developer for the fleet pattern and example tooling. Contact your CodeTogether representative for help packaging the rollout for your tooling.
Before you begin
You need one of the following:
- A setup link from your administrator, or portal access: for the IDE path. Ask your administrator for the workstation setup link, or open Onboarding (Setup) in the portal sidebar if you already have access. See Onboard a developer for the administrator's steps.
- Your server base URL: for the terminal path instead. Ask your administrator for the URL
your organization uses to reach the platform — the service hostname configured at
deployment (for example,
https://ctai.yourcompany.com), the same URL developers use to reach the portal.
Either way, you need network access to that URL from your workstation: setup downloads the tracker binary — or the IDE plugin — and reports completion over it.
1. Open the setup page
There are two ways in, and they land on two different pages that carry the same editor tabs — except that the portal page leaves out Visual Studio when that artifact is not staged:
- The workstation setup link your administrator sent opens a standalone page titled Workstation Setup. It needs no portal account.
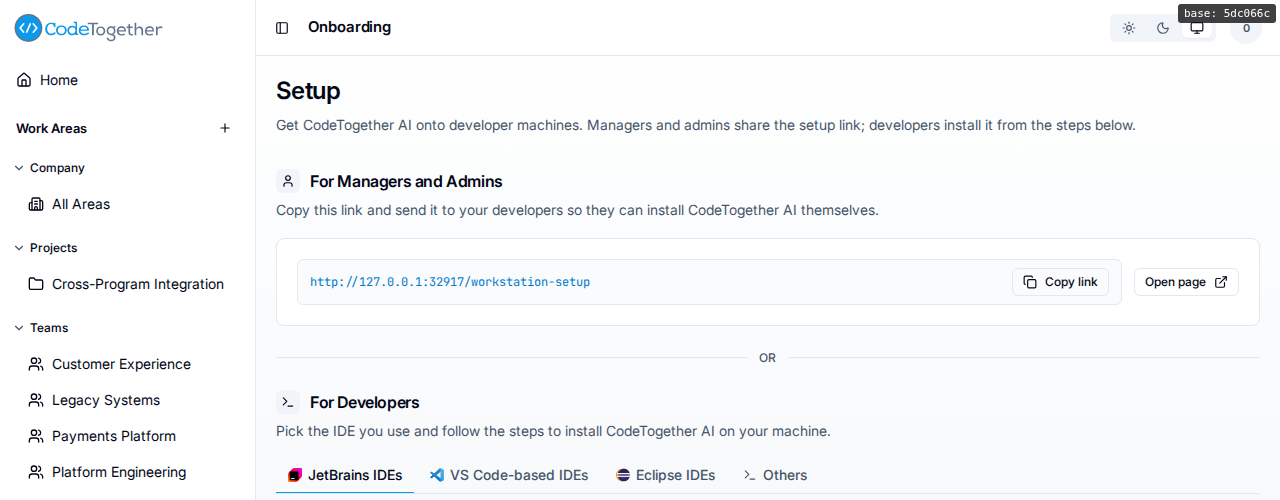
- Onboarding (Setup) in the portal sidebar, if you already have portal access, opens the page titled Setup: the link for administrators to hand out, under For Managers and Admins, and the same editor tabs, under For Developers.
2. Follow the steps for your IDE
Select the tab that matches the editor you use — on the portal page they are under For Developers — and follow the steps it shows.
The following table lists the available tabs:
| Tab | Use it for |
|---|---|
| JetBrains IDEs | IntelliJ IDEA, GoLand, PyCharm, WebStorm, and other JetBrains IDEs |
| VS Code-based IDEs | Visual Studio Code, Cursor, and other VS Code-compatible editors |
| Visual Studio | Microsoft Visual Studio |
| Eclipse IDEs | Eclipse IDE |
| Others | Editors not in this table, or command-line AI agents and MCP (Model Context Protocol) clients |
Visual Studio support is packaged per deployment, and the two entry points show that differently. On the workstation setup link, the Visual Studio tab is always there; when the server reports the artifact as not staged, its Download button reads Not available on this host and the tab says the artifact is not packaged for this deployment. On the portal's Onboarding (Setup) page, the tab is left out entirely. If instead you see a Couldn't check packaged plugin status warning above the tabs, the server did not answer at all, so availability is unknown either way. Ask your administrator whether Visual Studio support was packaged for your deployment.
Installing the plugin is the whole job for a supported IDE: it detects that setup is missing and configures your workstation the first time it runs.
Using a terminal instead
Use a terminal instead if you do not use one of the supported IDEs, or if you work primarily through command-line AI agents and MCP clients. This is the Others tab, on either page.
The Others tab shows a ready-made one-liner for macOS / Linux and for Windows
PowerShell, already carrying your server's address, with a Copy button. It downloads the
tracker and runs setup in one step, and it carries no credential — on-premises there is no
activation code to paste. Use it if you can; the aitrax setup system --url form is the
equivalent for a workstation that already has the aitrax binary.
aitrax setup system --url <server-base-url>
Replace <server-base-url> with your organization's base URL. A separate download host
applies only if your deployment serves artifacts from a different host; see
Troubleshooting.
Then confirm setup completed:
aitrax setup check
If system reports as configured, the workstation is connected.
$ aitrax setup check
{
  "system": {
    "configured": true,
    "missing": [],
    "loginCleanup": {
      "state": "clean"
    }
  }
}
3. Confirm the workstation is connected
After setup, confirm activity is reaching the portal:
- Make a commit, or run an AI session.
- Ask your administrator to open the Tracking tab of a work area you work in and confirm your name is on the Developer Tracking roster with a green check against a tool you use.
Tracking is the screen an administrator should look at after an activation: it reports recency per developer and per tool, and nothing else. A green check means that tool was used in the last 7 days, an amber clock means 1 to 4 weeks ago, and an empty cell means it was not used in the last 4 weeks. Only a work area's Owner or Admin sees the tab, which is why this step goes through your administrator. See Dashboards.
Activity does not appear instantly — processing runs asynchronously, so allow a few minutes
before treating an empty view as a problem. If you set up from a terminal, aitrax setup check above already confirmed the workstation itself is configured; this step confirms
activity is actually reaching your server.
Troubleshooting
The tracker binary cannot be downloaded
Setup downloads artifacts over the base URL unless a separate download URL is configured. If your
deployment serves artifacts from a different host, set AITRAX_DOWNLOAD_BASE_URL, which overrides
artifact downloads only.
Setup completes but the server records nothing
Setup reports completion to the server after activation unless reporting is disabled. Confirm
--no-report-setup was not passed.
If this doesn't fix it
Contact support with all of the following:
- The verbatim command you ran and its complete output.
- The base URL you passed, with any credentials removed.
- The output of
aitrax setup checkandaitrax doctor. - Your server version and
aitrax version.
Related
- AITrax CLI reference — the setup commands used here.