Onboard a developer
Use this guide to bring developers into capture. Developers are not invited like members; their work is captured the moment the AITrax tracker runs on their machine. You'll open the Onboarding page, send the workstation setup link, and point developers at the right path for their editor.
- Deployment: SaaS, On-premises
The Onboarding page is titled Setup in the portal and is available to every role, so a manager who spots a developer with no captured activity can onboard them without involving an admin.
Before you begin
To onboard developers, you need all of the following:
- Access to the portal: The Onboarding page is in the sidebar for every role.
- A way to reach your developers: You send them one link, so email or chat is enough.
- For step 4 only, Owner or Admin of a work area the developer works in: that is what the Tracking tab needs. Without it, confirm capture on the Flow tab instead, as step 4 describes.
You do not create developer accounts. Installing the tracker creates a developer identity automatically from the engineer's Git commit email and the editor or AI-tool account they work under. If one person commits under more than one email, their activity lands on separate identities; an administrator can link those identities at Settings > Developers so the activity is combined. See Members and developers.
1. Send the workstation setup link
The Onboarding page offers two paths. For onboarding a team, use the first:
- Open Onboarding (Setup) in the portal.
- Copy the workstation setup link under For Managers and Admins.
- Send it to your developers. Each developer installs AITrax themselves from that one link.
This is the fastest way to onboard a team: send one link and let each developer run the setup for their own machine. Their in-editor and AI-assisted work starts flowing once setup completes.
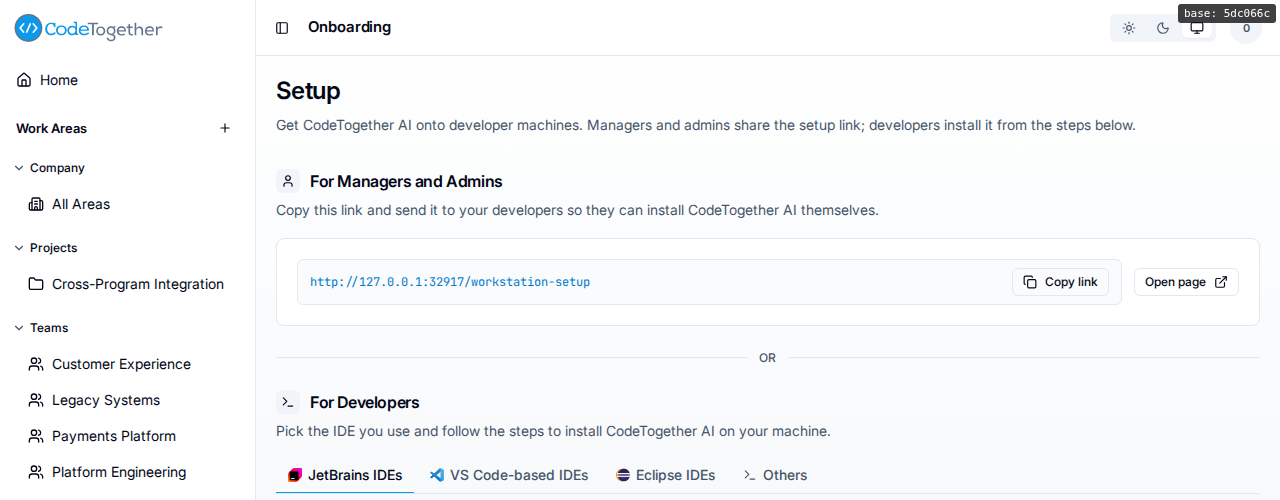
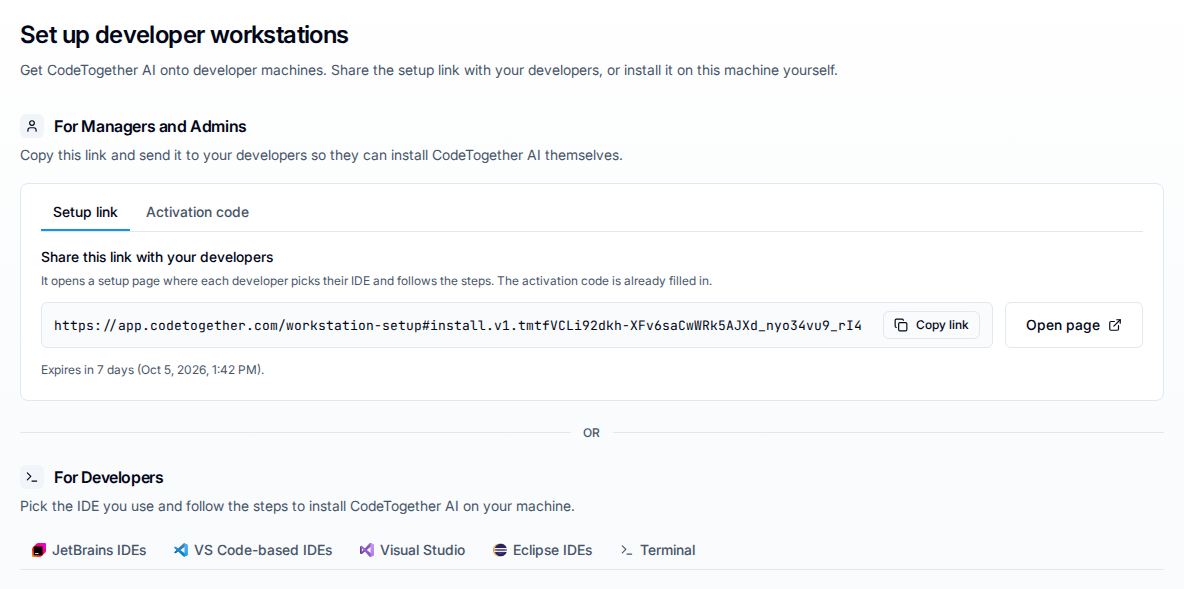
On SaaS, the sidebar item reads Onboarding and the page is titled Set up developer workstations. Its For Managers and Admins section carries the setup link on a Setup link tab, with Copy link and Open page, and the code itself on an Activation code tab. The link's expiry is shown under it.
2. Let each developer pick their editor
The developer path has a tab for each supported editor: JetBrains IDEs, VS Code-based IDEs, Visual Studio, Eclipse IDEs, and Others. On SaaS, the setup link opens a page titled Set up your workstation instead, and its last tab is Terminal rather than Others. The developer picks their editor tab and follows the steps. For a developer on a supported IDE, that is the whole job. See Set up your workstation for the developer's own steps.
Cursor is a VS Code-based IDE and is covered by the VS Code-based tab, not by Others.
3. Use the Others path for developers not on a supported IDE
Some developers do not work in a supported IDE, or work primarily through command-line AI agents such as Claude Code, Codex CLI, or Copilot CLI, and MCP (Model Context Protocol) clients such as Claude Desktop. For them, capture cannot attach to a repository's project configuration, so it is set up at the user level on the workstation.
On-premises, this is the Others tab on the Onboarding page; on SaaS, it is the Terminal tab of the Set up your workstation page. The on-premises tab's own description states it plainly: use this setup command only when the developer does not use any supported IDE. The setup configures user-level CodeTogether AI settings for local development activity on that workstation.
Instead of writing capture config into a specific repository, the Others setup writes configuration into the developer's home directory: a per-user capture config and cache, plus user-level hooks and telemetry wiring for the AI tools they use. Without a repo checkout there is no project-level place to attach capture, so this setup captures those agent and CLI sessions and attributes them to the right person, including work that is not tied to any Git repository.
To run it:
- Open a terminal on the workstation.
- Choose the command for the operating system, a macOS or Linux shell command or the Windows PowerShell equivalent.
- Copy, paste, and run it. It runs the user-level setup.
For large fleets, the same user-level command can be pushed by a software-management system such as Intune, Jamf, GPO, or Ansible, so every machine is configured automatically without anyone opening a terminal.
What the command carries depends on your deployment, and only one of the two forms is a secret:
- On SaaS, the command carries an activation code, as
--activation-code <code>. That code connects the workstation to your tenant, so store it as you would any other credential in your configuration-management system. A code stays usable until it expires, so an old command may well still work — that is a reason to rotate it, not to reuse it. Copy a fresh command from the Terminal tab of the Set up your workstation page for each rollout. See Activate a workstation on SaaS. - On-premises, the command carries your own server's address and no credential at all. Reachability to that address is what decides which machines can activate. See Activate a workstation against your server.
4. Confirm the developer is capturing
After setup, confirm capture reached the portal:
- Have the developer make a commit, or run an AI session.
- Open a work area the developer works in and select its Tracking tab. The tab is visible to that work area's Owner or Admin only; if it is not there, use the Flow tab instead, as this step's last paragraph describes.
- Under Tool usage and tracking, type the developer's name into Search developers on the Developer Tracking card, and confirm at least one tool cell carries a green check.
Tracking is the purpose-built answer to "is this developer reporting?": a row per developer and a column per tool, reporting recency rather than a quantity. A green check means that tool was used in the last 7 days, an amber clock means 1 to 4 weeks ago, and an empty cell means it was not used in the last 4 weeks.
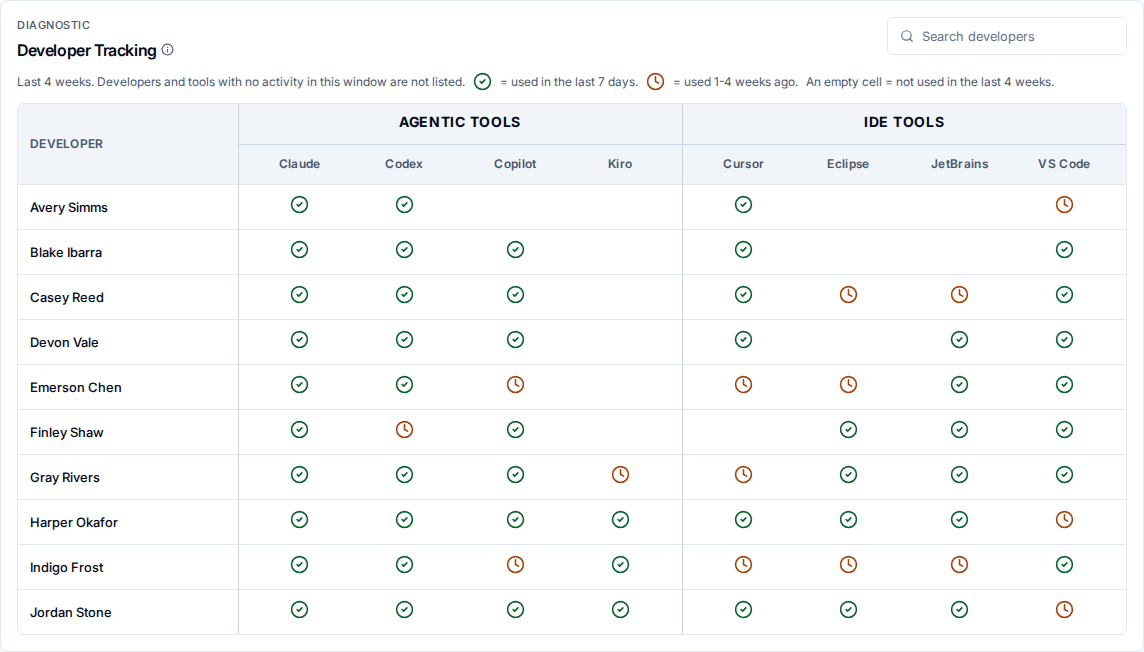
The roster only lists developers and tools with activity in the last 4 weeks, so a name that is absent has not reported yet rather than been dropped.
If you do not see the Tracking tab, use the developer roster on the Flow tab instead. On a single project, team, or mixed work area it always lists people; on a combined work area, and on All Areas once other work areas exist and more than 20 developers are in scope, it lists work areas instead, and a row drills into that work area.
Activity does not appear instantly, because processing runs asynchronously. See No activity appears for a developer if a developer stays missing, and Dashboards for the rest of what Tracking shows.
Troubleshooting
A developer shows only part of their work
AITrax has to be set up for each IDE a developer uses. Someone working in both VS Code and IntelliJ who completed only one setup shows only half their work. Confirm every editor they use is set up.
A CLI-only developer shows nothing
Command-line agents and MCP clients are captured by the user-level terminal setup, the Terminal tab on SaaS and the Others tab on-premises, not by an IDE tab. Confirm that setup ran on that workstation.
Developers stay on an old tracker version
Trackers update themselves from the server they report to, so a fleet normally converges on the current version without a second rollout. On-premises, an administrator can hold that back: Settings > General > Tracker Updates carries an Automatic updates card with a Pause automatic updates switch, off by default. While it is on, the server withholds new tracker versions from every connected client. Check that switch before re-running setup across the fleet.
If this doesn't fix it
Contact support with all of the following. Tickets missing these take longer to resolve:
- Which editors or AI tools the developer uses.
- Whether the IDE tab setup or the user-level terminal setup (the Terminal tab on SaaS, Others on-premises) was run.
- The developer's operating system and the commit or session you expected to see.
- Your deployment kind and server version.
Related
- Set up your workstation — the developer's own setup steps.
- Members and developers — why installing the tracker is how you add a developer.
- No activity appears for a developer — diagnosing a developer who stays missing.