Activate a workstation on SaaS
Use this guide to activate your workstation on a CodeTogether AI SaaS tenant. You'll open the setup link your administrator sends, follow the steps for your IDE, enter the activation code when your IDE asks for it, and confirm the workstation is connected.
- Deployment: SaaS
Before you begin
You need one of the following:
- A setup link from your administrator: The link carries the address of the setup page and an activation code that connects your workstation to your tenant.
- The activation code itself, if you can reach the setup page: With portal access, Onboarding at the bottom of the portal sidebar opens it; without portal access, ask your administrator for the link, which carries the page address as well as the code.
Ask your administrator if you have neither. An activation code expires; the administrator sees the expiry next to the code when they issue it.
1. Open the setup link
Open the setup link your administrator sent in a browser. What you see depends on whether the full link arrived intact:
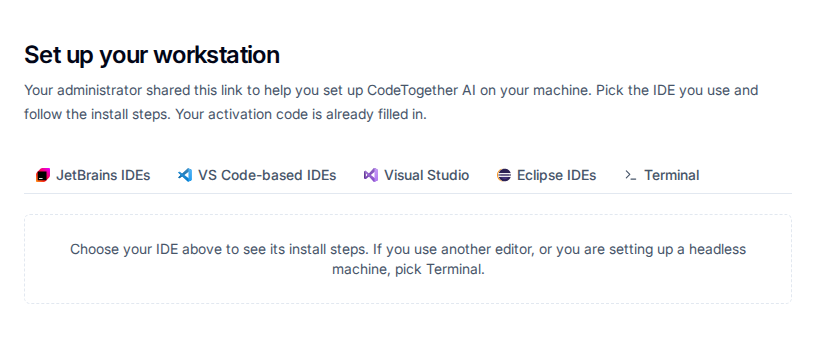
- You see the page's IDE tabs: The activation code arrived correctly. Go to step 2.
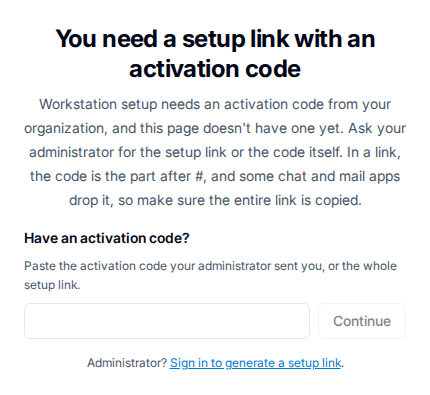
- You see a card titled "You need a setup link with an activation code": The activation code was stripped from the link. This happens when a chat or email client removes the part of a link after
#. Paste the full original link, or the code itself, into the Have an activation code? field on that card and select Continue. If you cannot retrieve either, ask your administrator to send the link again. - You see a card titled "This setup link looks incomplete": The code arrived but was truncated or altered in transit. Paste the full code into the Have an activation code? field on that card, or ask your administrator to send the link again.
If you opened the page from Onboarding in the portal sidebar instead of from a link, the no-code card is titled Set up this workstation and carries the same field.
2. Follow the steps for your IDE
The page has a tab for each supported editor and a Terminal tab. No tab is selected when the page opens; the prompt asks you to choose your IDE, or Terminal if you use another editor or are setting up a headless machine.
The following table lists the available tabs:
| Tab | Use it for |
|---|---|
| JetBrains IDEs | IntelliJ IDEA, GoLand, PyCharm, WebStorm, and other JetBrains IDEs |
| VS Code-based IDEs | Visual Studio Code, Cursor, and other VS Code-compatible editors |
| Visual Studio | Microsoft Visual Studio |
| Eclipse IDEs | Eclipse IDE |
| Terminal | Editors not in this table, and headless or CI machines |
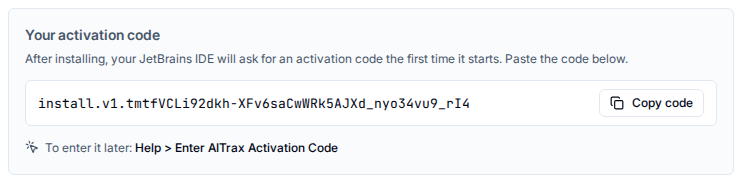
Each IDE tab opens with an Important notice: install the CodeTogether AI plugin, AITrax, from your organization's package on that page, not from your IDE's public marketplace, because the marketplace version does not connect to your organization. The install steps follow, then a Your activation code block with a Copy code button.
Your IDE asks for the activation code the first time it starts after the plugin is installed; paste the code from that block. Entering it runs the workstation-level setup, which also registers command-line AI agents such as Claude Code, Codex CLI, or Copilot CLI and MCP (Model Context Protocol) clients on that machine. If you skip the prompt, the block also names where to enter the code later:
| Tab | Where to enter the code later |
|---|---|
| JetBrains IDEs, Visual Studio, Eclipse IDEs | Help > Enter AITrax Activation Code |
| VS Code-based IDEs | Command Palette > AITrax: Enter Activation Code |
The Terminal tab shows one command for macOS / Linux and one for Windows PowerShell with the activation code already in it, as --activation-code <code>. Copy, paste, and run the one for your operating system. It runs the same workstation-level setup the IDE prompt does, so it does not require an IDE or a repository to be open; use it on a machine without a supported IDE.
If you use more than one editor, install the plugin for each one. A developer who installs it for only one of two editors captures only that editor's sessions.
3. Confirm the workstation is connected
After setup, confirm activity is reaching the portal:
- Make a commit, or run an AI session.
- Ask your administrator to confirm you appear on a work area's Tracking tab, which lists every developer who reported from a tool in the last four weeks.
Activity does not appear instantly — processing runs asynchronously, so allow a few minutes before treating an empty view as a problem. See No activity appears for a developer if nothing arrives after that.
Troubleshooting
The setup link takes you to a card asking for a link or a code
A chat or email client stripped the part of the link after #, which carries the activation code. Paste the full original link, or the code itself, into the Have an activation code? field and select Continue. If the page answers "That doesn't look like an activation code", what you pasted is not the whole code or the whole link; copy it again from the original message.
Setup completed but no activity appears in the portal
Confirm the plugin is installed for each editor you use. A developer using two editors who installed it for only one shows only that editor's sessions.
If you work only with command-line AI agents and have no supported IDE, confirm the Terminal command ran on your workstation.
Your IDE never asked for the activation code
The prompt appears the first time the IDE starts after the plugin is installed. Enter the code by hand from the menu path in step 2, or run the Terminal command, which carries the code and runs the same setup.
This workstation was already set up before
If this workstation was activated by an older, per-repository setup command instead of the current setup link, running the current setup link's command still works. Setup detects the existing installation and upgrades it to the current workstation-level model automatically — you do not need to remove the old setup first.
If the activation code belongs to a different organization than the one already configured, setup asks you to confirm before replacing the existing setup. Declining leaves the existing setup untouched.
If this doesn't fix it
Contact your administrator or support with all of the following. Tickets missing these take longer to resolve:
- The verbatim error message, if any.
- Your editor or AI tool and operating system.
- Which tab you used on Set up your workstation.
Related
- Onboard a developer — the administrator's view of the setup flow, including the user-level path for command-line tools.
- Set up CodeTogether AI SaaS — the full admin journey that produced the setup link you received.
- No activity appears for a developer — diagnosing missing activity after setup.
- Members and developers — how your workstation identity connects to captured activity.