Invite users to your organization
Use this guide to bring people into your organization. You'll pick where to send the invite from, send it, confirm it was accepted, and adjust the person's access afterward.
- Deployment: SaaS, On-premises
- Role: Owner, Admin
An invite carries the access the person receives. The page you send it from decides that access, so choose the page before you type an address.
Before you begin
To invite someone, you need all of the following:
- Owner or Admin on the organization: Managing users and role grants requires one of these tenant roles. On an on-premises deployment the Owner role is labelled Super Admin. See Roles reference.
- The role you intend to grant: Decide whether the person needs organization-wide administration, or access to one work area. That decision picks the page you invite them from.
- The invitee's email address: Every invite is addressed to one person by email.
1. Choose where to invite from
Two pages send invites, and they grant different things. The following table lists them:
| Invite from | Grants | Use it for |
|---|---|---|
| Settings > Access > Users | An organization-wide tenant role, and no work area | Administrators and read-only auditors |
| A work area's Manage access drawer | Organization membership plus a role on that work area | Everyone who needs one team's dashboards |
Invite people who only need one team's dashboards from that work area. To reach its drawer, open the work area, select Work Area actions at the top right of the page, then select Manage access. Select Add member to invite someone by email with a work area role. See Create a work area for what that drawer grants.
Everything below covers the Settings > Access > Users path.
2. Send the invite
- Go to Settings > Access > Users.
- Select the invite button. On-premises it reads Invite Admin; on SaaS it reads Invite and opens the Invite user dialog. Both dialogs repeat where everyone else is invited from: people who only need a Work Area role are invited from that Work Area.
- Enter the person's email address. On SaaS, also choose the System role the invite carries.
- Select Send invite. The dialog closes, and that is the only feedback you get: the page stays on the tab it was on. To confirm the invite was sent, open the Pending invites tab yourself, as a later step describes.
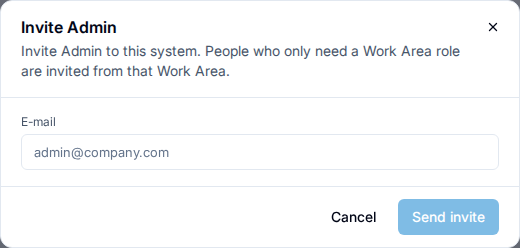
The on-premises dialog has no role control, because every invite it sends carries Admin. Neither dialog has an expiry control for an email invite: it expires 14 days after it is sent, and a fresh one must be sent after that.
Transactional email must be configured for the invite to reach the recipient. On-premises, outbound email is one of the four deployment dependencies — see Prepare your environment.
3. Invite a read-only auditor, on SaaS
- Deployment: SaaS
The SaaS Invite user dialog offers two things an on-premises deployment does not have:
- A choice of role. Its System role list carries either Admin or GlobalViewer, the read-only role that sees every work area. An on-premises deployment has no GlobalViewer invite: invite the person as Admin, or invite them from a work area, and change their role afterward from Settings > Access > Users.
- A shareable link invite. Select the Shareable link tab, choose the System role, choose 7 days, 30 days, or 90 days in Link expires after, set Maximum uses, and select Create link. Distribute the URL it gives you. A link invite grants access to whoever holds it, so treat one as a credential.
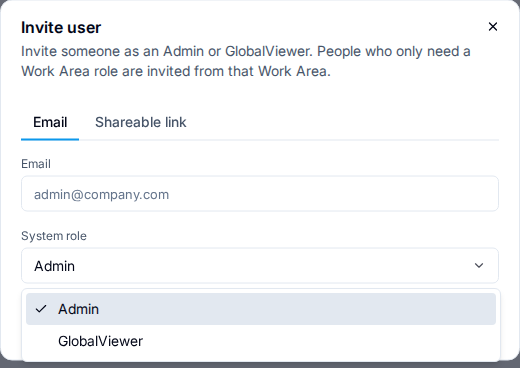
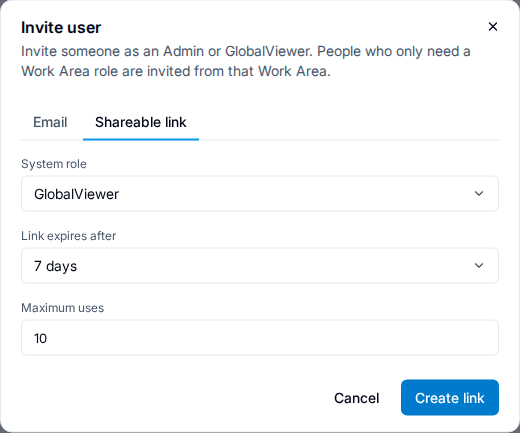
The same two choices appear in step 3 of the SaaS setup guide on Home, Invite your team, where the role list reads Global viewer. See Set up CodeTogether AI SaaS.
Neither deployment invites anyone as Owner. Grant it from the Role list on Settings > Access > Users after the person accepts, where on-premises it is the Super Admin option and on SaaS it is Owner. Only someone who already holds that role can grant it.
4. Confirm the invite was accepted
Open the Pending invites tab on Settings > Access > Users. It lists the invites that are still outstanding, and each one reports a status. The following table lists the statuses an invite moves through:
| Status | Meaning | Listed on Pending invites |
|---|---|---|
pending | Sent, not yet accepted | Yes |
accepted | Redeemed, and the grants have been applied | No |
revoked | Cancelled before acceptance | No |
expired | Passed its expiry without being accepted | No |
An invite that leaves the Pending invites tab has reached one of the other three states. If it was accepted, the person is on the Active tab with the role you intended; confirm that rather than looking for the invite.
To cancel an invite that has not been accepted, use the revoke action on the invite's row, then confirm. On SaaS the row reads Revoke, beside Resend, which sends the invite email again.
A work area invite states what acceptance grants: "On accepting the invite, they receive access to this Work Area with the role chosen below, and to any other Work Areas they have a pending invite to." That trailing clause is on-premises behaviour, and the on-premises form is the only one that shows it: someone holding three pending work area invites lands with all three grants. SaaS spends one invite at a time, so its form omits the clause and accepting one invite leaves the others pending.
5. Adjust their access afterward
You can change one person's work area access without opening the work area. Expand their row on Settings > Access > Users and the Work Areas panel lists every work area they can reach. A grant made directly to them reads direct and carries a role list you can change in place; a grant they inherit from a group reads via and the group's name, and is changed by editing the group. Add Work Area access below the list grants a new one, defaulting to Viewer.
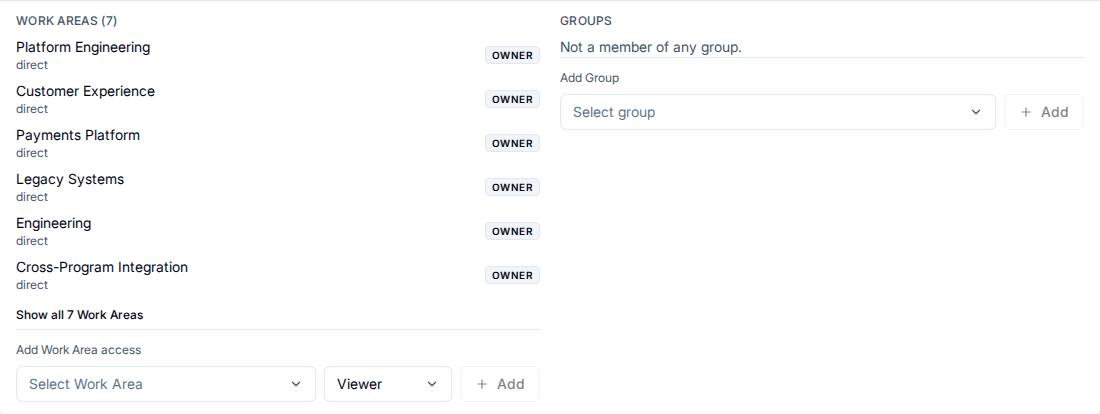
The same row's Groups panel adds the person to a group, which is how a group's conferred role reaches them. See Manage access with groups.
Troubleshooting
The invitee never received the invite
Invites depend on transactional email. Confirm your organization has an email provider configured, then send again. If it is not configured, no invite can arrive, and on SaaS a shareable link invite is the workaround.
The link invite stopped working
A link invite stops accepting new people once it reaches its use limit or its expiry, whichever comes first. Check the use count against the limit, then issue a new link. Link invites are a SaaS feature; an on-premises deployment has none to check.
The person accepted but cannot see any dashboards
Organization access and work area access are separate. An invite sent from Settings > Access > Users names no work area, so aggregate dashboards stay empty until they hold a work area role. Grant one from the Work Areas panel on their row, or invite them again from the work area itself. See Roles reference.
The person accepted but sees no activity of their own
Their portal login is not yet linked to the committer identity their commits carry. See No activity appears for a developer.
They were deactivated and reactivating did not restore their access
Reactivate is offered on the Deactivated tab for a person who held Admin or Owner; a deactivated Member is invited again from a work area instead. Reactivate says what it does not restore: "Their groups and Work Area access were removed when they were deactivated. You will need to grant those again after they accept." Reactivating sends a fresh invite and nothing else. Grant the groups and work area roles again once they accept.
If this doesn't fix it
Contact support with all of the following. Tickets missing these take longer to resolve:
- The page you sent the invite from, and the role it carried.
- The invite status and, for a SaaS link invite, its use count and maximum uses.
- The invitee's email address and whether they hold an account already.
- Your deployment kind and server version.
Related
- Roles reference — what each role can do before you grant it.
- Create a work area — creating the work area an invite grants access to.
- Work areas — why membership and coverage are separate.
- Members and developers — how a login connects to captured activity.